Upgrading to an SSD: Disk Cloning Tips
Hey everyone! I’ve got this old HP Pavilion laptop that’s still chugging along with Windows 10, and I’m looking to breathe new life into it by upgrading to an SSD. Has anyone out there done this before? I’d love some advice on the best software to use and the steps to follow. I’m not super experienced with disk cloning, so any tips or guidance would be greatly appreciated! Thanks!
Why Clone Disks on Windows 10/11 PCs or Laptops
Upgrading to a Larger Disk
A lot of PCs and laptops start out with smaller hard drives, often around 500GB, which can fill up fast. Instead of buying a whole new PC, you can swap out your old hard drive for a larger SSD using good disk cloning software. It’s a more budget-friendly option.
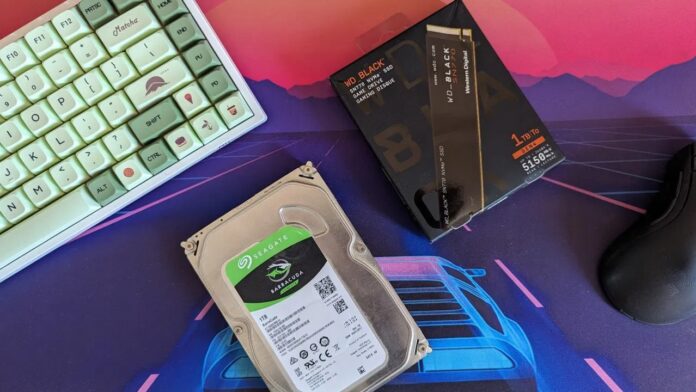
Replacing an Old HDD with a New SSD
Upgrading to an SSD can make a huge difference in your computer’s speed by improving data transfer rates. Users generally find their system performs much better after this upgrade. Gamers, in particular, can benefit from an SSD, as it reduces lag and improves gameplay, especially in fast-paced online FPS games.
AOMEI Backupper: Your Ultimate Disk Cloning Tool
I’ve got to tell you about this fantastic disk clone tool I found for system backup and cloning. It’s a total game-changer! Not only does it handle cloning, but it also offers backup, synchronization, and a bunch of other powerful features. Today, let’s focus on its cloning capabilities.
If you’re searching for top-notch disk cloning software for Windows, AOMEI Backupper Professional is the way to go. It focuses on system backup and cloning. This software is super user-friendly and has already earned the trust of millions worldwide.
Why AOMEI Backupper Stands Out:
- Flexible Cloning Options: With AOMEI Backupper, you can easily clone HDD to an SSD or another HDD. Need to clone just specific partitions or the operating system? No problem, it’s got you covered.
- Clone to Any Size Drive: It’s pretty smart—it only copies the used sectors, so cloning to a smaller drive is a breeze. Upgrading to a bigger one? The “Edit Partitions” feature helps you make the most of your new disk space.
- SSD Optimization: AOMEI Backupper aligns partitions for SSDs, enhancing their speed and longevity.
- Wide Compatibility: It works with all Windows versions, from 11 down to XP, in both 32-bit and 64-bit. Plus, it supports a wide range of drives like HDDs, SSDs, USB drives, and more.
Give AOMEI Backupper a try and see the difference for yourself!
Step-by-Step Guide to Cloning Your Windows 10 SSD
Before diving into cloning your disk with AOMEI Backupper on Windows 10/11, make sure to follow these essential steps:
- Back Up Important Data: Ensure all crucial files on the destination disk are backed up to prevent any data loss during cloning.
- Check Disk Space: Confirm that the space used on your original Windows 10/11 hard drive fits on the target SSD. If you’re upgrading to a larger SSD, even better.
- Convert Dynamic Disk to Basic: If your disk is currently dynamic, convert it back to a basic disk before starting the cloning process.
- Prepare Tools: Have your screwdrivers ready—you might need to open up your laptop or desktop.
- Connect the SSD: If your laptop only has one hard drive slot, use a 2.5″ SSD enclosure or a SATA-to-USB cable to connect the new SSD.
Ready to Clone Your Windows 10/11 Hard Drive? Here’s How:
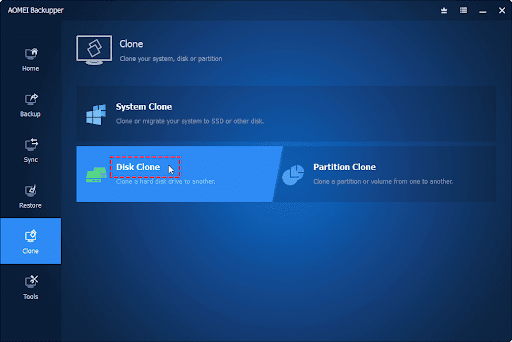
1: Launch AOMEI Backupper: Open the software and go to Clone > Disk Clone on the main screen.
Quick Tip: If you only want to clone your Windows 10/11 system along with all your programs and drivers, select the System Clone option instead.
2: Select Source Disk: Choose your Windows 10/11 hard drive and click Next to proceed.
3: Select Destination Disk: In the next window, select the larger SSD as your destination and click Next to continue.
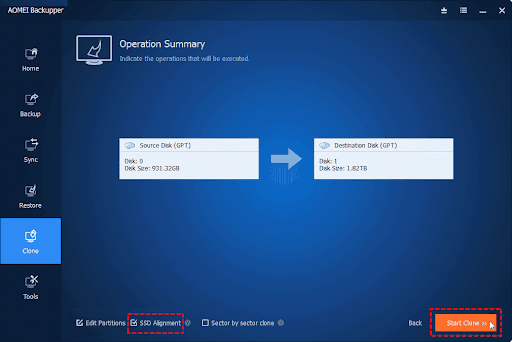
4: Enable SSD Alignment: Check the SSD Alignment box to optimize the read and write speeds on your new SSD. Then click Start Clone to begin the HDD to SSD cloning process on Windows 10/11.
5: Finish the Cloning Process: Once the cloning reaches 100%, click Finish to wrap up and close the window.
Quick Tips:
- MBR to GPT Cloning: If you’re cloning from MBR to GPT, remember to switch between Legacy and UEFI after the cloning process.
- Sector-by-Sector Clone: This method copies everything from your original hard disk, making the process longer. You can’t use the “Edit partitions” option with this method. If you’re upgrading to a larger SSD, use a free partition manager to resize and utilize the full capacity.
- Avoid Sector-by-Sector Cloning for Smaller SSDs: Don’t use this method if you’re moving from a larger HDD to a smaller SSD.
- Edit Partitions: This feature allows you to resize partitions on your new hard drive when upgrading from a smaller Windows 10/11 disk. Uncheck “Add unused space to all partitions” to get some extra room on the larger SSD.
Following these steps will ensure a smooth and efficient cloning process, giving your system the upgrade it deserves!
Your Turn
Cloning a hard drive in Windows 10/11 with AOMEI Backupper is incredibly straightforward, thanks to its intuitive interface. Just a few clicks and you can replicate your entire Windows setup. But that’s just scratching the surface—it also allows you to clone from large HDDs to smaller SSDs, switch between different-sized disks, clone SATA SSDs, and even migrate Windows to NVMe SSDs.
Beyond cloning, AOMEI Backupper offers powerful backup options. You can back up individual files, entire partitions, or whole disks, and create system images. These backups are invaluable when restoring Windows to a new drive. And if you’re dealing with server-level tasks, AOMEI Backupper Server provides advanced features tailored to meet your needs.


